esynchro Tuesday Tip!
April 29,2014
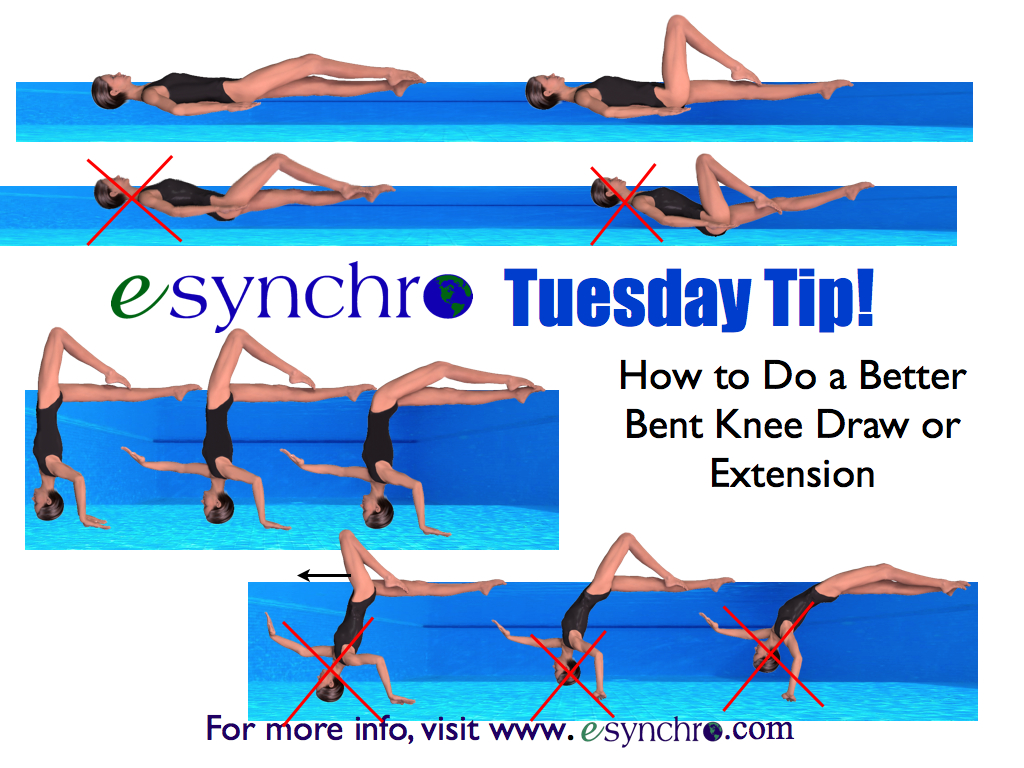
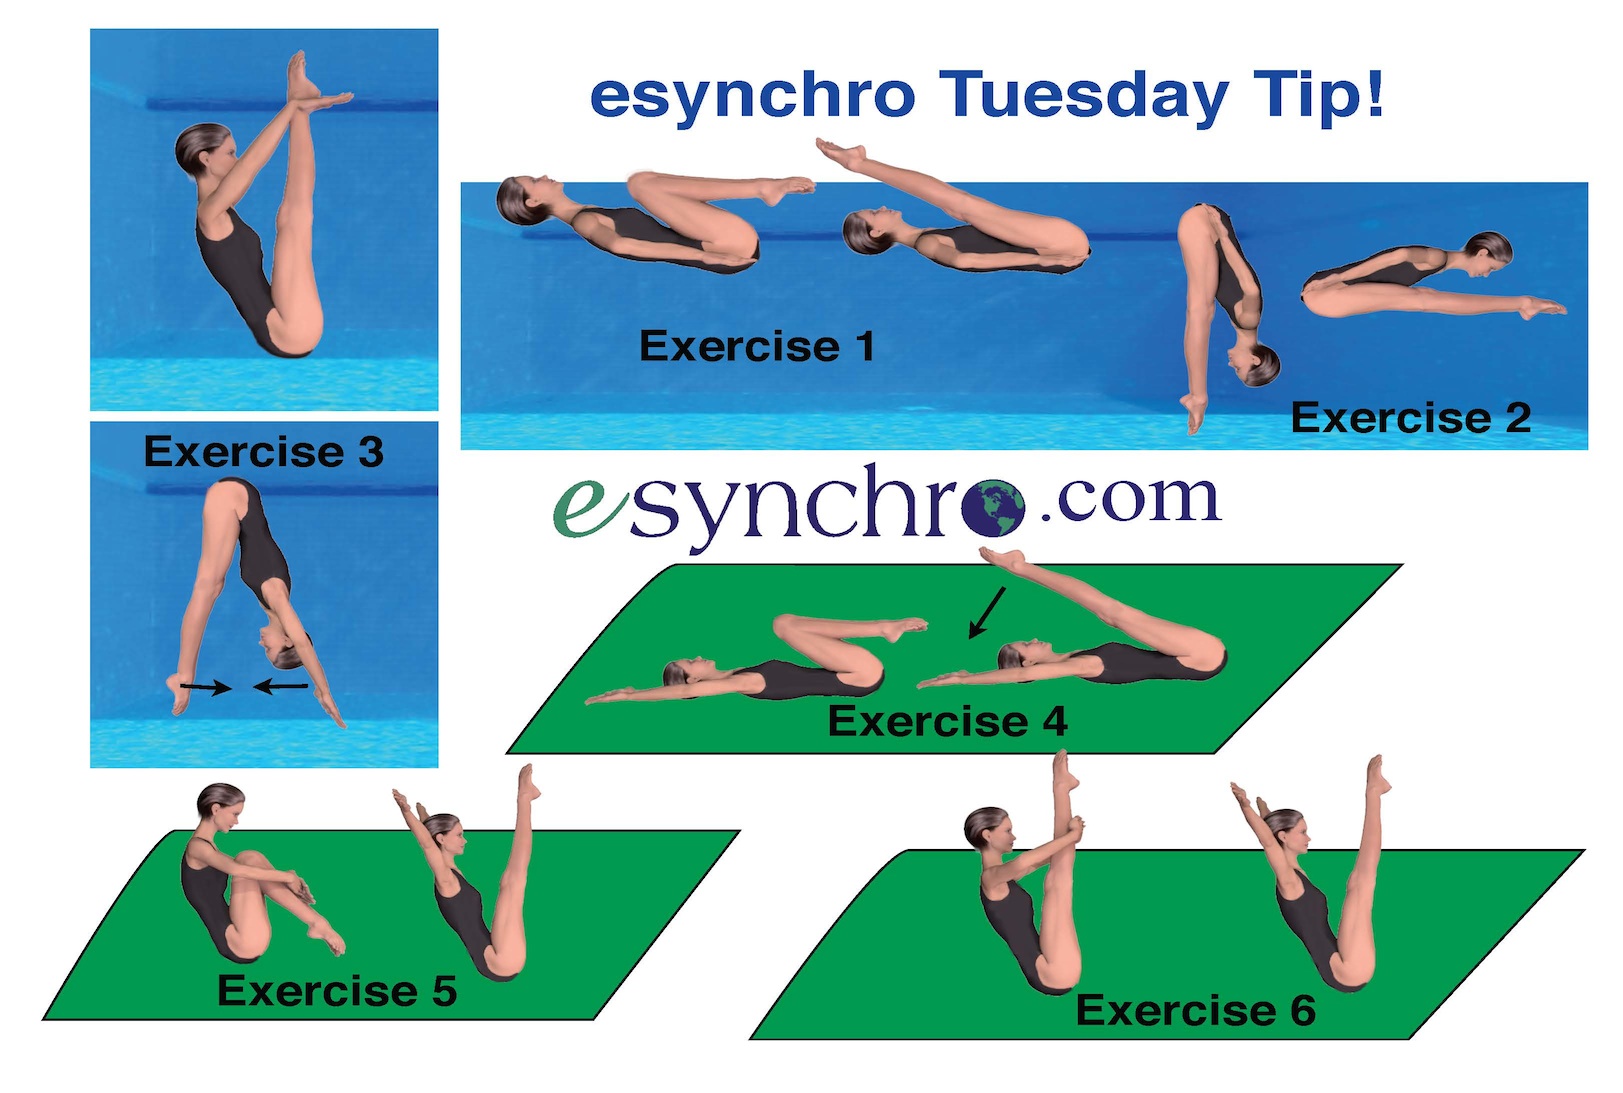
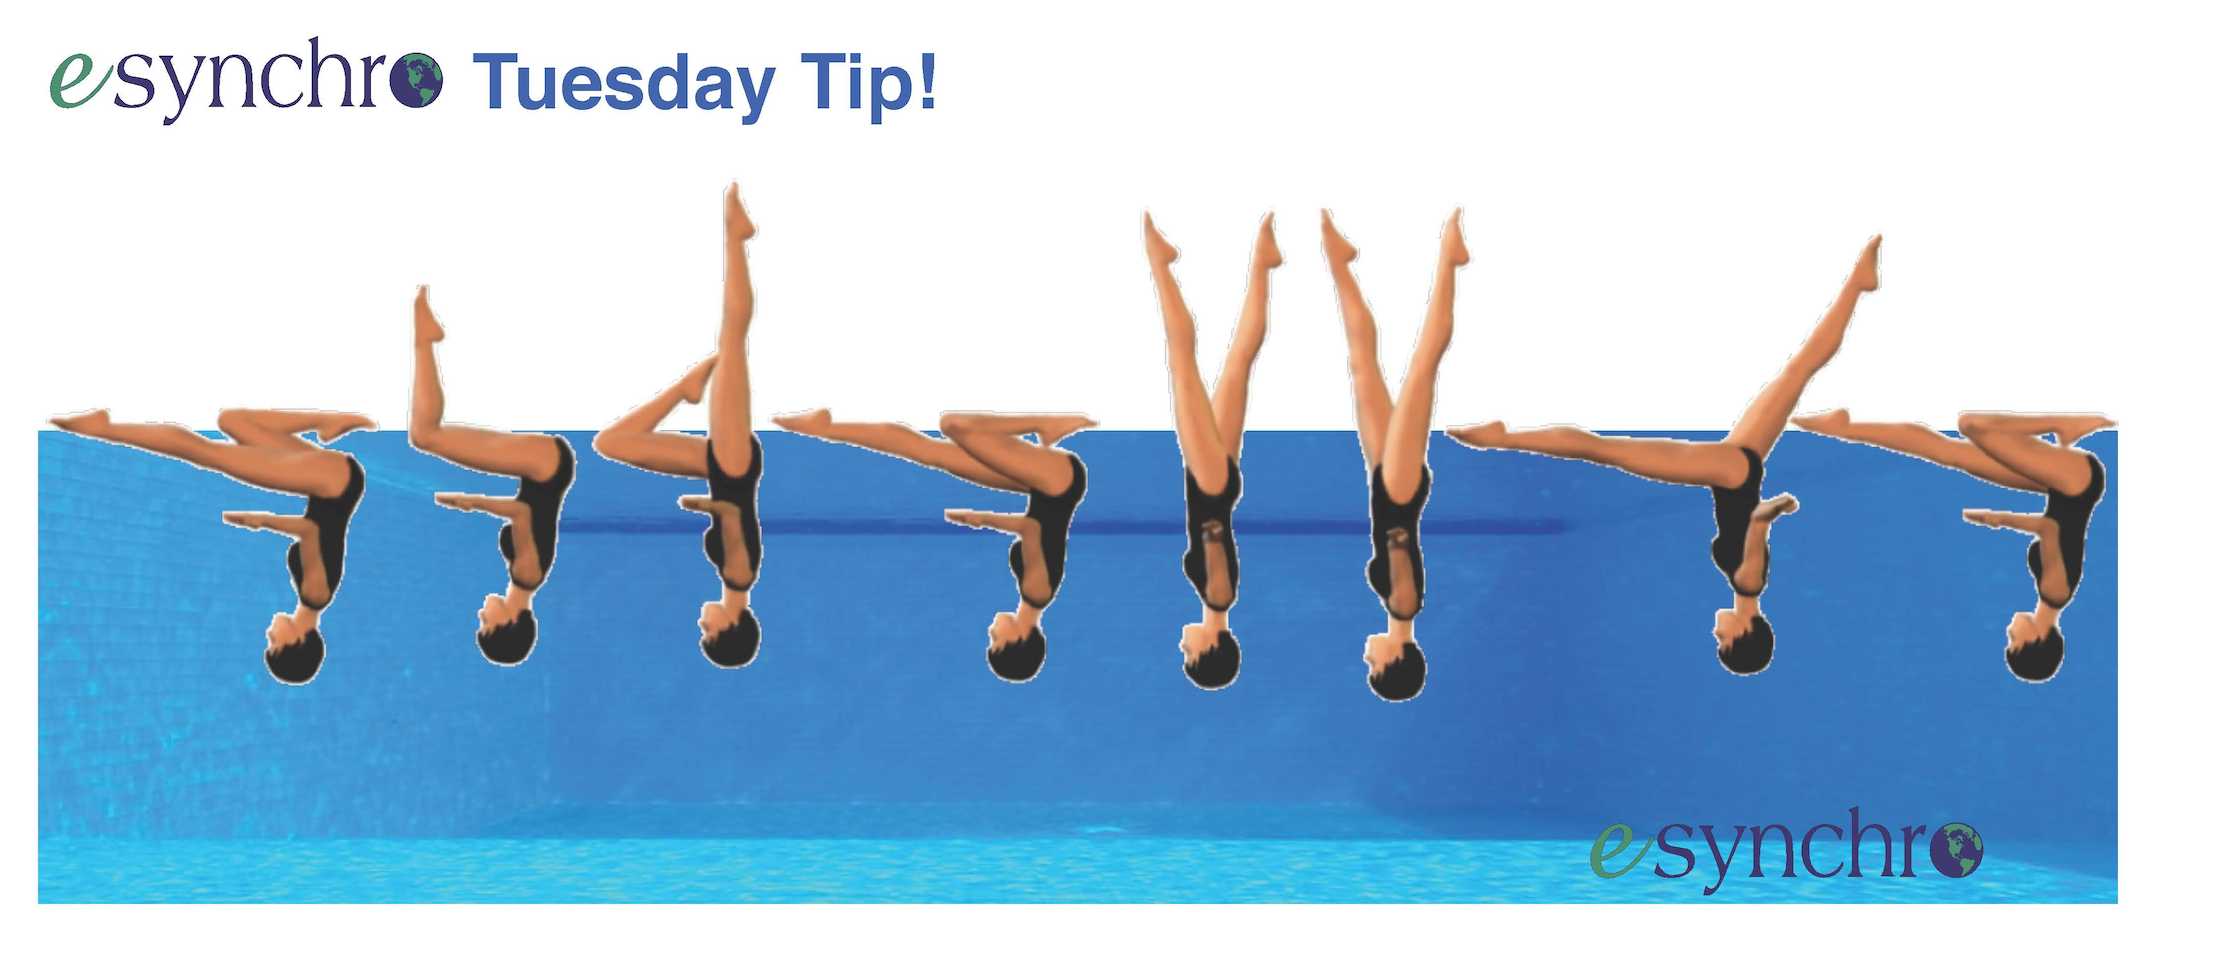
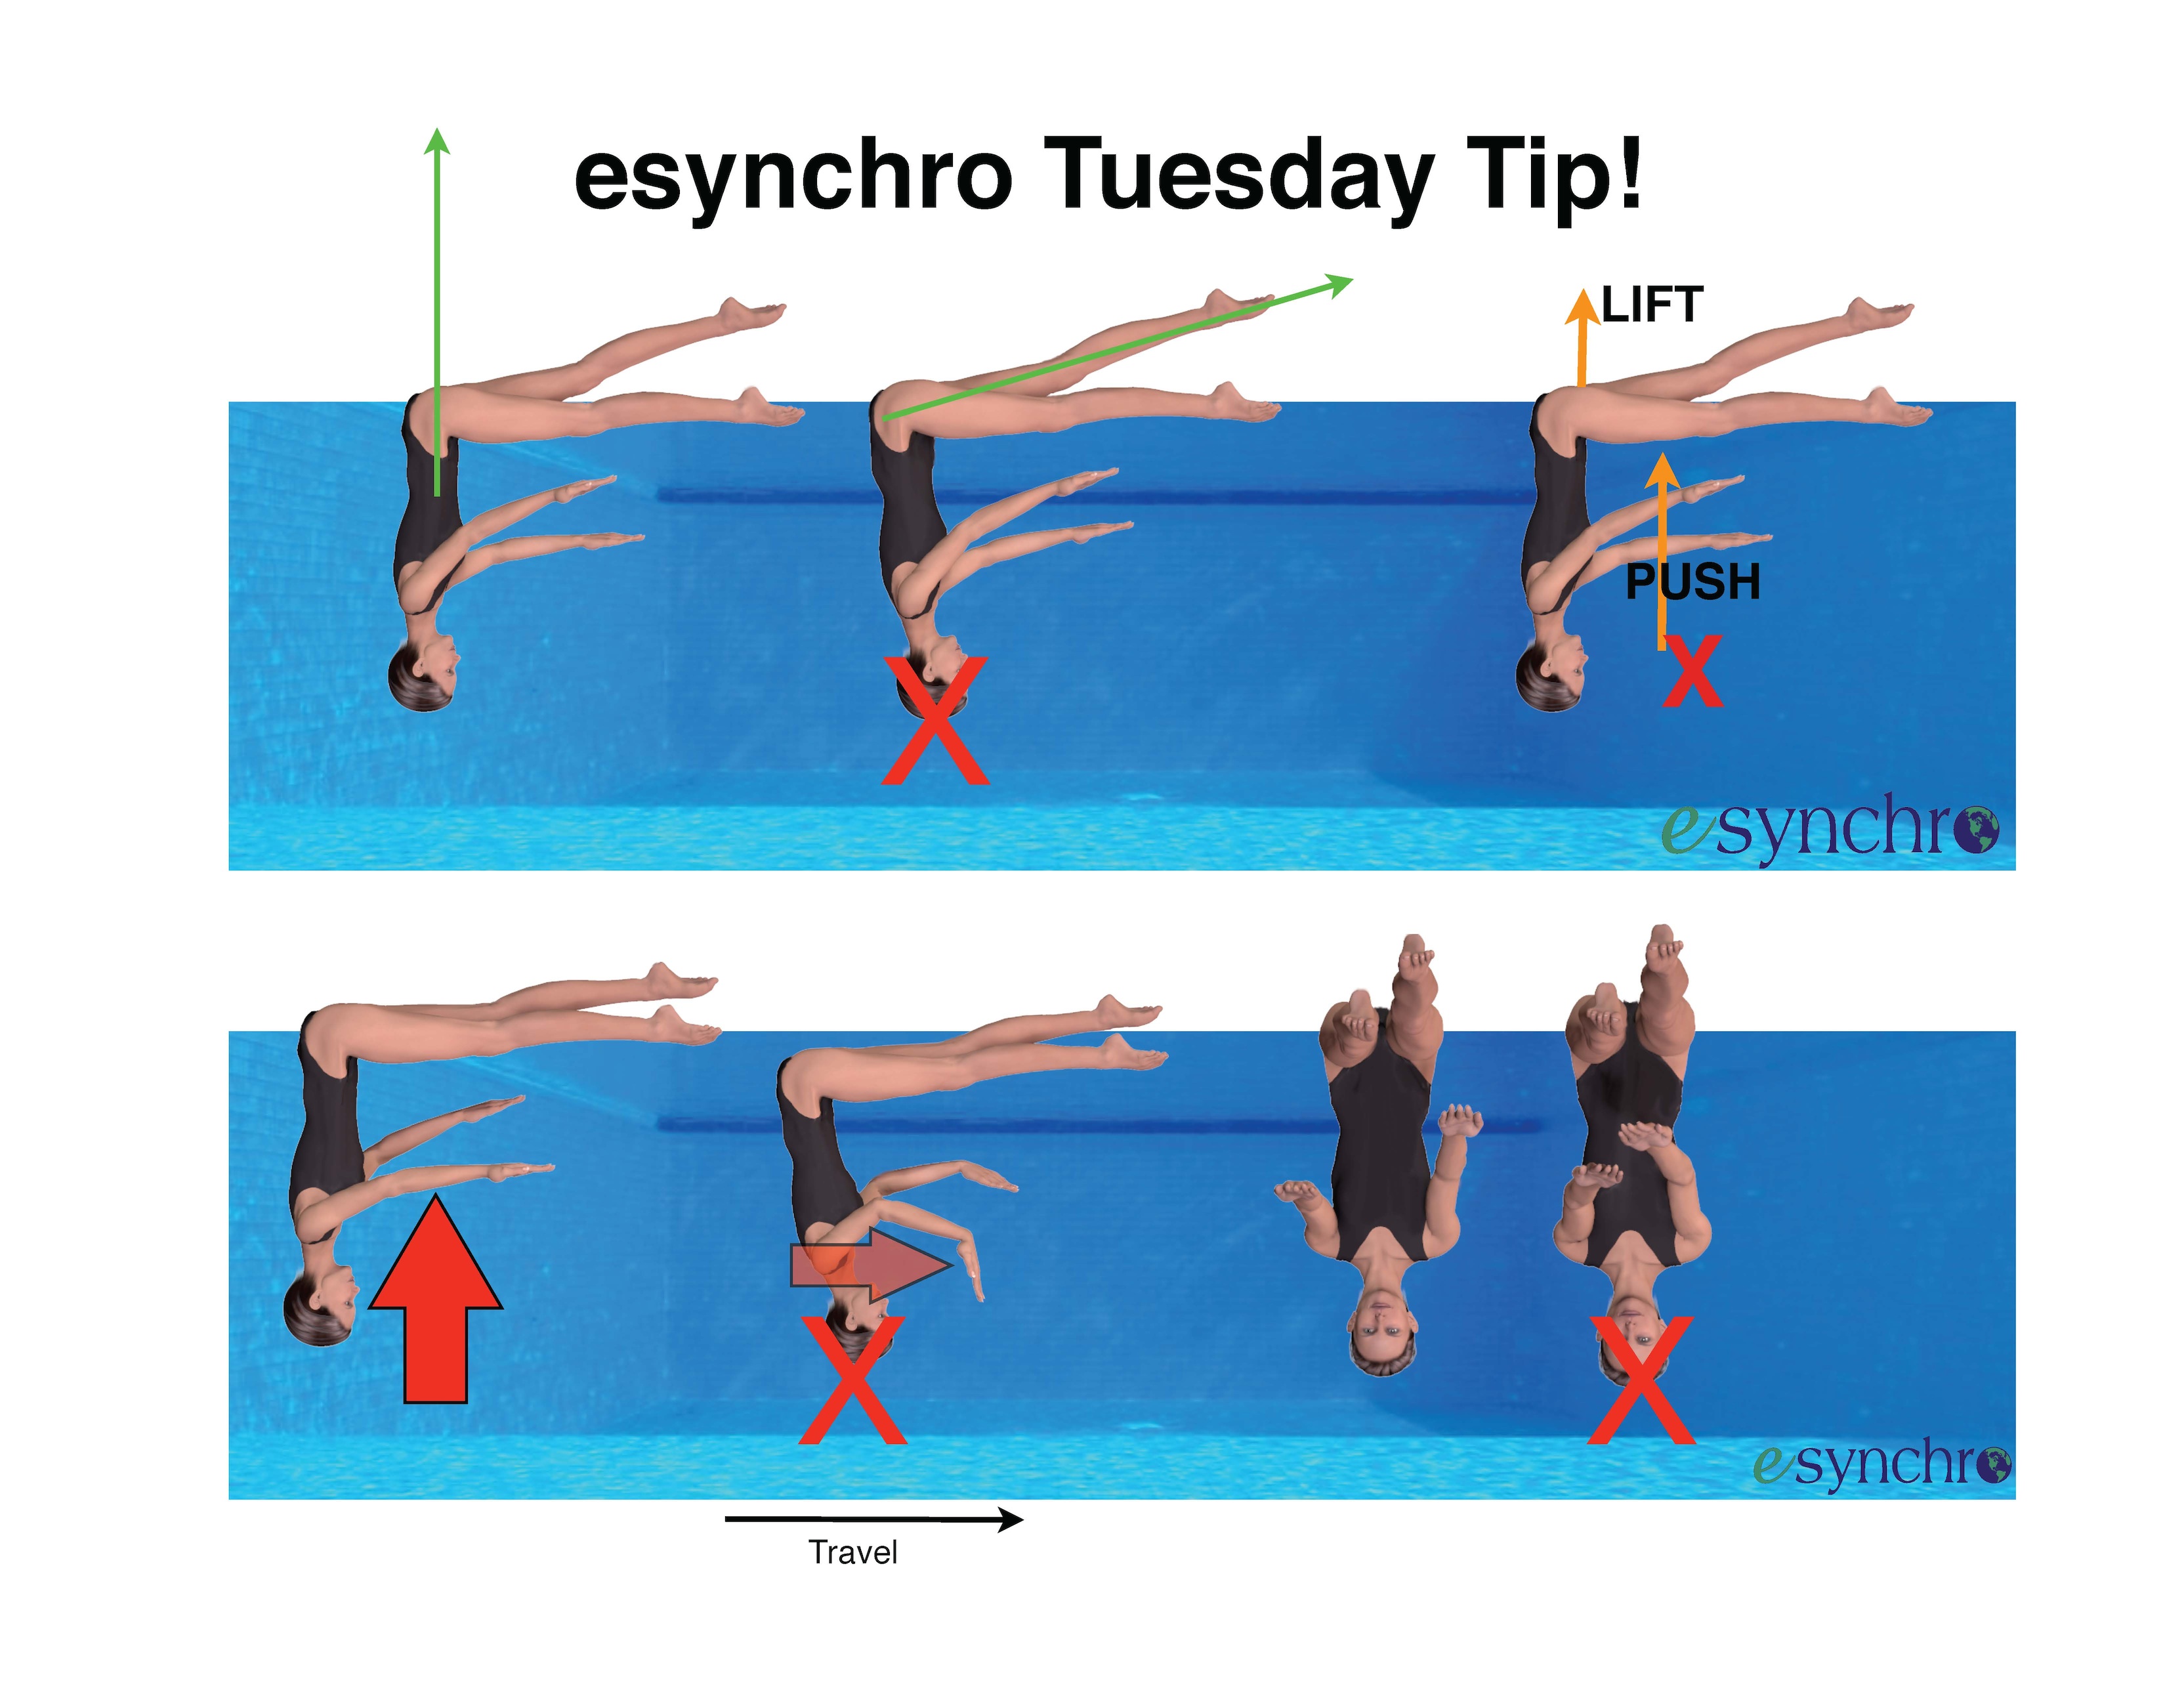
How to Do a Better Bent Knee Draw or Extension
The Bent Knee draw in a Ballet Leg is a difficult skill to master with height and control. It requires good back strength and control of the center of gravity. The bent knee draw for the Oceanita is also difficult, requiring great flexibility, back strength and mastery of split arm scull.
4 Tips for a Better Bent Knee Draw:
- Draw the big toe along the top edge of the horizontal leg. Use the shin bone as a path for the toe.
- Extend the ankle so there is a straight line from the front of the knee through the toes.
- Lift the toe up to initiate the bend.
- Lift the knee up into the bent knee versus pulling the knee toward the chest.
To work on the draw, start with the extension from the bent knee into the layout first and from the bent knee surface arch into the surface arch. The reverse skill is a little easier to master- and is also part of figures- the Manta Ray and Ballet Leg. When straightening the leg, feel as if it extends almost above the surface and focus on the straight / horizontal leg rising up to the surface.
At the beginning or end of a figure, the bent knee draw or extension has a big impact on the rest of the figure!
esynchro Tuesday Tip!
Earth Day- April 22, 2014
In celebration of Earth Day, let’s appreciate the EARTH!
Add some root vegetables to your meals today! Roots are the foundation for all plants and are essential for support and nourishment. Root vegetables are rich in vitamins such as A,C,E, K and the B vitamins; Minerals like magnesium, iron, potassium, calcium, zinc and selenium; and antioxidants. Root vegetables are healthy for your brain, blood, digestive system and all of your body.
Healthy and delicious ways to prepare root vegetables:
- Roast with olive oil, garlic, a little salt, pepper and other herbs.
- Saute with olive oil, slt, pepper and garlic.
- Braise in a little broth with herbs like rosemary, thyme and parsley.
- Roast and then mash. Or even add some mashed vegetables to your mashed potatoes for added flavor- and nutrition!
- Slice thinly and bake or fry into healthy veggie chips.
- Make into a gratin with broth, cream, a little cheese and bread crumbs. Leeks are a great choice for a gratin.
- Grate and fry in a pan into hash browns to go with breakfast.
- Juice: add into your juicer and drink up lots of vitamins, minerals and antioxidants!
Eating root vegetables can help you feel physically and mentally grounded, increasing your stability, stamina and endurance!
Finally, before or after practice, go out for a walk on a trail or in a park and enjoy the green grass and flowers of spring. Inhale deeply and cleanse the chlorinated pool air from your lungs and body!
Happy Earth Day!
esynchro Tuesday Tip April 15, 2014
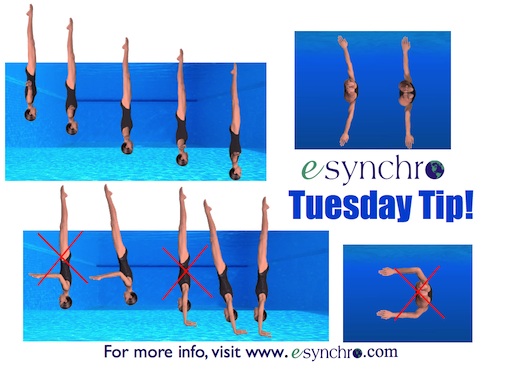
Tips for a Better Vertical Descent
A Vertical Descent is often the last impression judges have of your figures. Performing a great vertical descent can boost your scores. A good vertical descent should:
Descend smoothly
Descend evenly
Maintain alignment
Descend slowly
Maintain control
8 Tips to perform a better vertical descent:
- Stay in support scull for most, if not all, of the descent.
- Feel the water slide smoothly up the legs.
- Gradually decrease the size and pressure of support sculls from maximum height.
- Keep arms and sculls out to the sides of the body.
- Relax the tension in the arms and hands gradually as height goes down.
- Scull with a very small range when height nears the ankles - or floating point.
- At about the floating point, rotate the arms so the palms are facing the surface and gently scull the feet underwater.
- Pause in the vertical underwater and do a neat back somersault to finish the figure.
Don’t:
- Rapidly transfer the arms overhead at the beginning of the descent.
- Use big support sculls.
- Scull in front of the body.
- Quickly release the tension in the arms.
Remember, this is the last part of the figure the judges see. Make it the BEST!
esynchro Tuesday Tip April 8, 2014
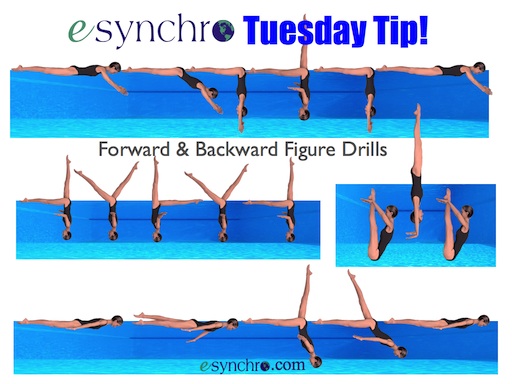
Forward & Backward Figure Drills
Repeating figure transitions in the forward / normal direction and then returning to the starting position in the reverse direction can help improve sculling transitions, body control and awareness. Below are several suggestions for forward & backward figure parts.
- Start in a front layout. Pike into a surface front pike and then lift to a fishtail. Pause in the fishtail and then lower the vertical leg to the surface into a surface front pike. Straighten up to a front layout.
- Start in a fishtail. Perform the Jupiter transition into the knight position and pause. Then return to the fishtail.
- Start in a front layout. Lift one leg to an arched fishtail as in a swordfish straight leg. Pause and lower back to the front layout.
- Start in a submerged back pike position. Thrust to vertical and then as you descend return to the submerged back pike.
For variety, repeat at different tempo’s and pay attention to arm position, muscular tension in the body, orientation and extension.
esynchro Tuesday Tip April 1, 2014
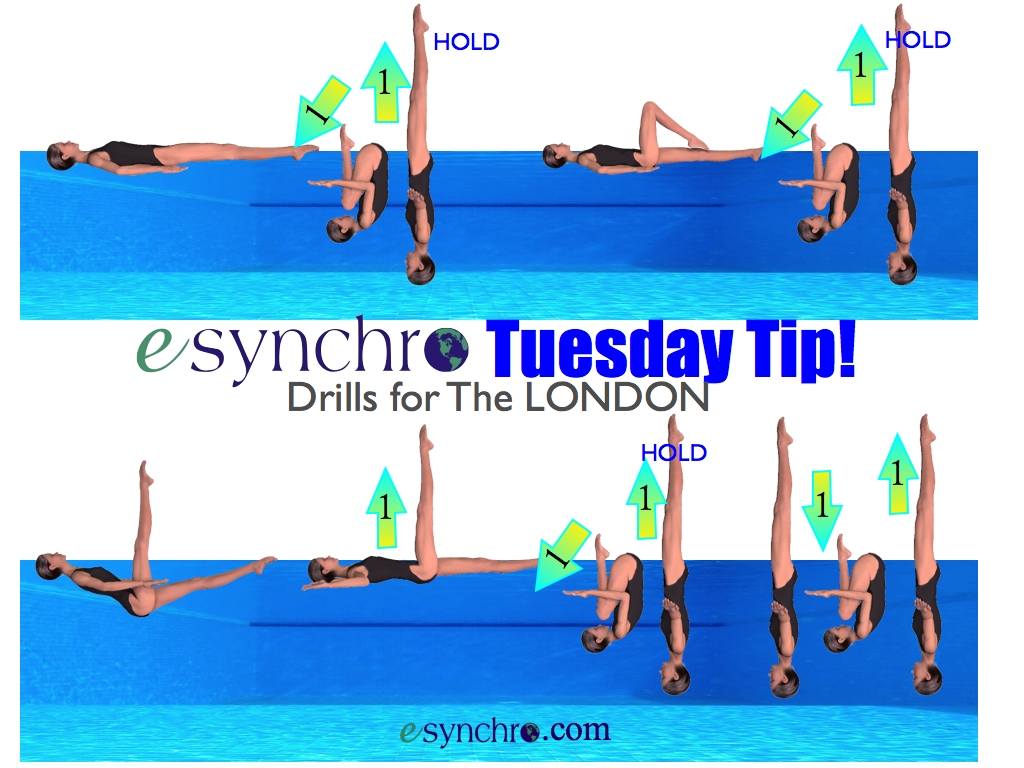
Drills for the London
- Start in a back layout. Tuck and roll in one count. Pause and lift to vertical in one count. Hold the vertical.
- Start in a bent knee position. Tuck and roll in one count. Pause and lift to vertical in one count. Hold the vertical.
- Start in a low ballet leg. Press up to maximum height. Tuck and roll in one count. Pause and lift to vertical in one count. Hold the vertical.
- Start in a vertical position. Pull rapidly into a tuck position. Pause and then lift rapidly into a vertical. Repeat 4 to 10 times for one set. Then slow down to 2 counts for the tuck and extension and repeat 3 to 6 times. Slow down to 3 counts per part and repeat 2 to 5 times. Slow down to 4 counts per part and repeat 2 to 5 times.
esynchro Tuesday Tip March 25, 2014
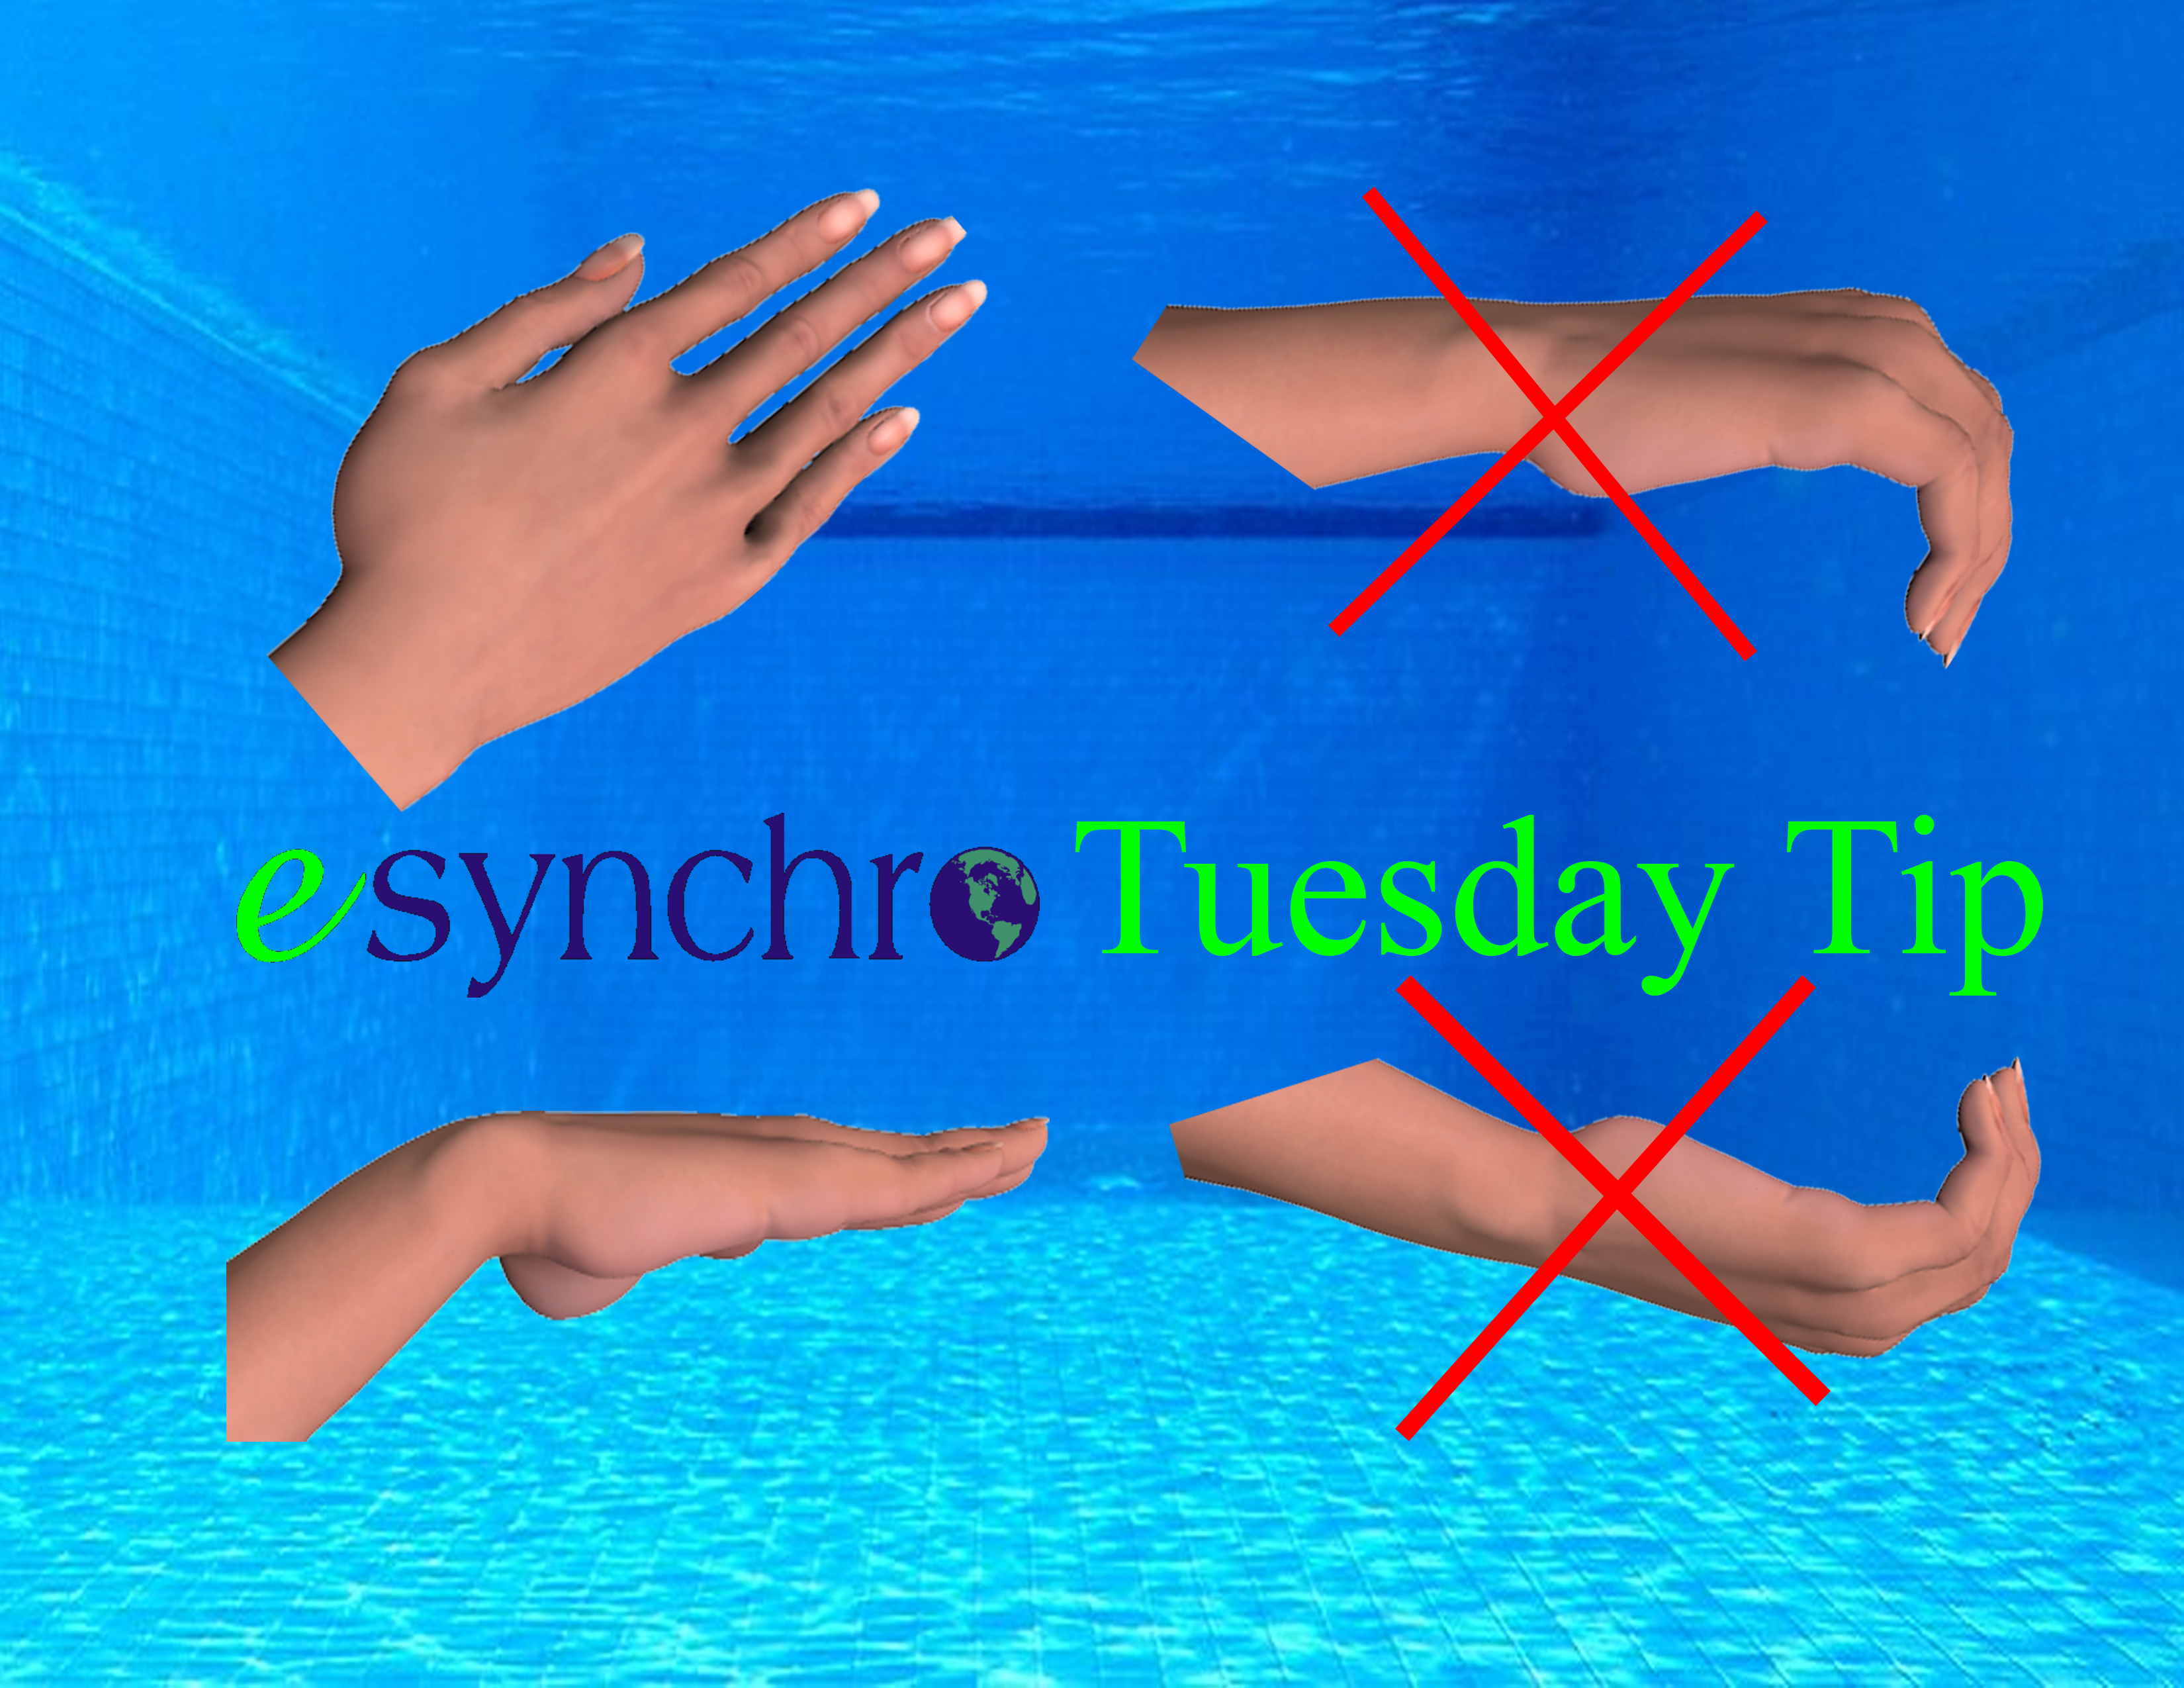
Our hands are the most important part of sculling- because many swimmers think the hands are the only part of sculling, and because the hands let a swimmer create lift force in the water. We put so much focus on our hands that we better make sure that we are using them in the best way.
Your hands should be as wide and flat as possible when you are sculling. The bigger the surface area of your hands, the greater amount of force you can generate. It is like swimming with hand paddles on- you create more force or pull because the area of your hand is larger. When you tighten and cup your hands to help stop travelling, you reduce the surface area, and therefore reduce the amount of force you can generate.
7 Tips for your Hands:
1. Make your whole hand wide and flat.
2. Extend out through your fingertips to keep them long and straight.
3. Imagine your hands are big paddles in the water.
4. Adjust the bend in your wrists and elbows to stop backward travel.
5. Do not cup your hands to pull forward or grab the water. Change the path and position of your sculling instead.
6. Keep your hands relatively loose- at about a tension level of 5 out of 10. When your tighten your hands, you lose your feel for the water and only feel the tightness in your hands.
7. Remember, sculling utilizes the whole arm and shoulder to create lift force and leverage to lift your hips and legs above the water.
esynchro Tuesday Tip March 18, 2014
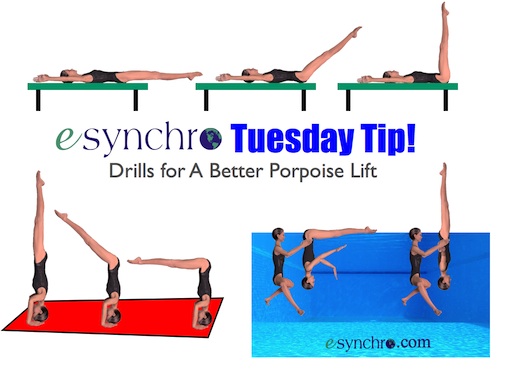
3 Drills for a Better Porpoise Lift
The porpoise lift from a surface front pike to a vertical at maximum height requires great strength and technique to perform well.
- Lay on a bench on your back with legs extended off the end of the bench. Extend the arms overhead. Lift both legs simultaneously to vertical. Pause and lower the leg. Focus on keeping the back flat on the floor. Set your abdominals and keep the spine extended. If necessary, use your arms to hold the bench when first trying or start with leg lifts on the floor to strengthen the abdominals. Repeat at various speeds.
- Get in a headstand (or handstand) with both legs extended in a vertical. Slowly lower the legs into a pike, pause and lift up to vertical again. Keep the back vertical. Make sure you have a teammate or coach as a spotter when first trying. Start by lowering your legs only part way to horizontal and then increase to the horizontal, i.e. Pike, as you develop strength.
- In the pool, get in your pike position with a teammate behind you to hold your hips at the surface. Do your porpoise lift with your teammate holding your hips. Pause in the vertical and then lower to the surface. Focus on keeping your back flat and long. Repeat at various speeds.
Although many of you are not in a strength or endurance building phase of training, you can still do these exercise to learn the correct feel and tension required to do a great porpoise lift. The pool drill with a teammate can help you gain the feel of a porpoise lift at maximum height.
Focus tip for the Porpoise lift: Lift the legs with the upper hamstrings- upper back side of the thighs- and imagine your legs are light. When you tighten and try to push with your quadriceps, the legs fell heavy and pull you down.
esynchroTuesday Tip! March 11, 2014
5 Reasons to Use Totem in a Walkout
During a walkout, a swimmer needs to transition into different sculls several times. Transition into totem/ overhead torpedo scull as the leg reaches vertical and then move into split arm scull as the leg moves closer to the surface arch. Using totem/ overhead torpedo results in:
- More height: swimmers can keep the hips closer to the surface.
- Better extension: the moving leg appears more extended and longer as it passes through the top.
- Better alignment: it is easier to keep the hips and head aligned with less “incorrect” arch in the mid back.
- Smoother movement: When transitioning from support scull to overhead/totem to split arm scull, the change in sculling flows cleanly and maintains constant support. When changing from support scull directly to split arm scull, both arms move suddenly and simultaneously, often causing loss in height and jerky movements.
- More effortless: Transitioning though totem/overhead torpedo provides greater support through the wide position of the arms with less sculling.
Perform a Better Walkout with totem/overhead torpedo!
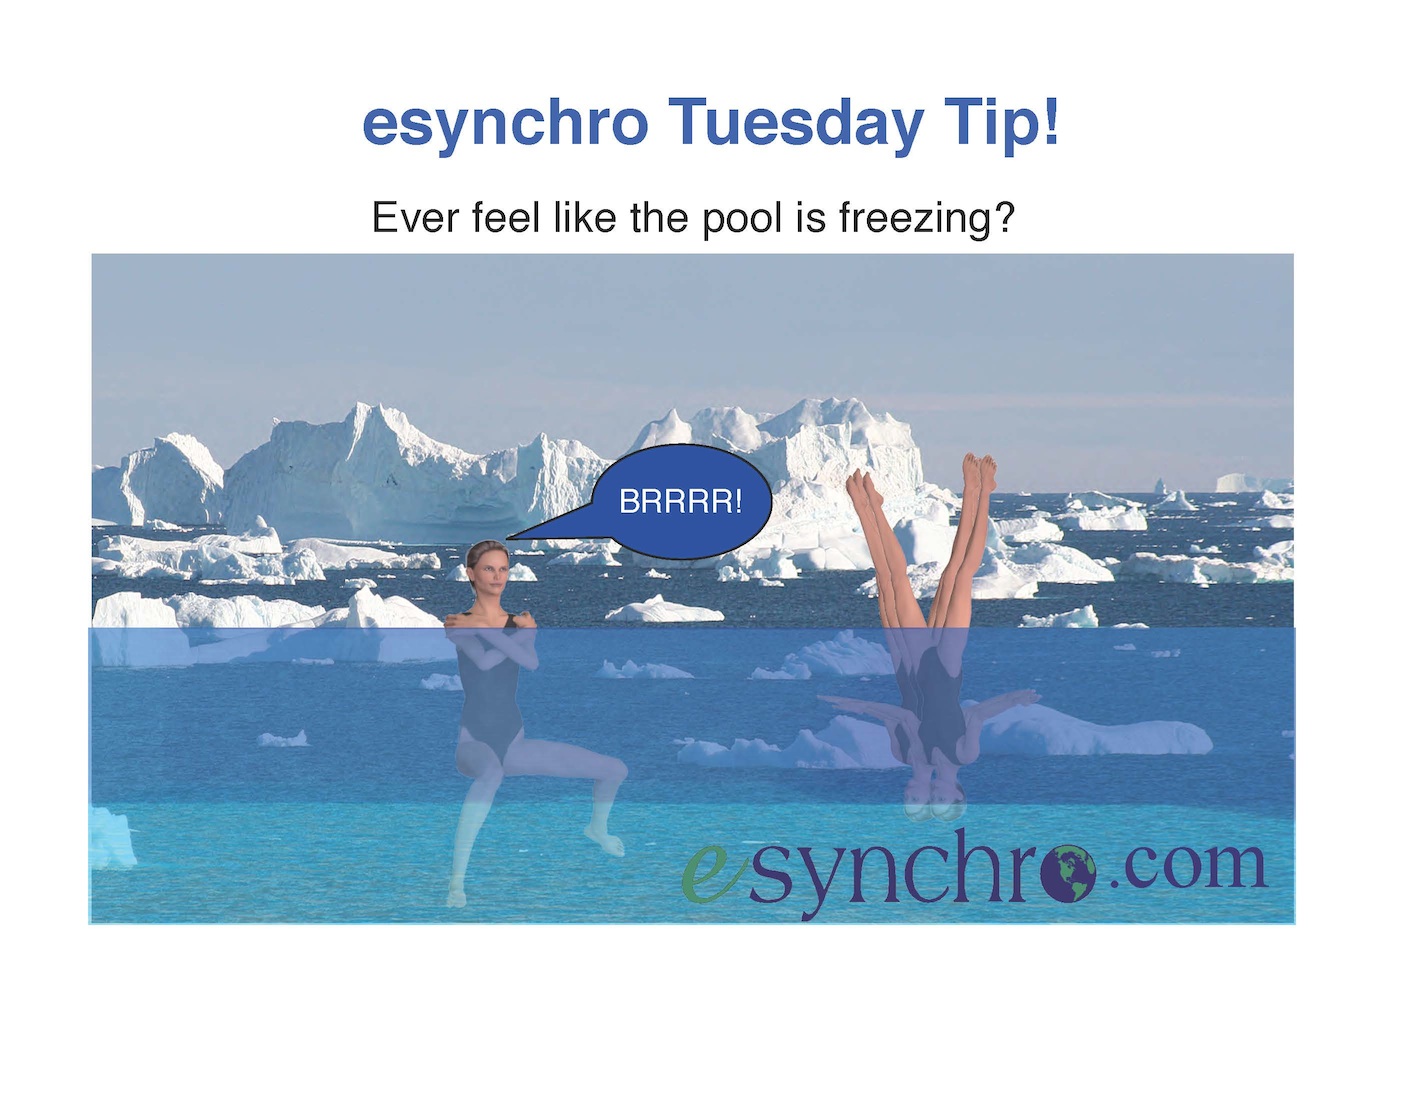
esynchro Tuesday Tip! March 4, 2014
Does it ever feel like the pool is full of icebergs?
Do you ever get so cold you can hardly move?
Staying warm is an important factor in training effectively and preventing injury.
Tips for Staying Warm at Practice
- Warm Up: Obviously..... What we mean is do a good warm-up. Swim and kick enough laps to really get warmed-up. A warm-up should raise your body temperature, increase your heart rate and increase blood flow to all of your body, especially your arms and legs that are working. If pool time is limited, you can do a good warm-up on land to elevate your body temperature, but you will probably still need at least a short warm-up in the pool, because the water temperature will most likely be lower than the air temperature and your body temperature.
- Keep Moving: Instead of hanging on the wall when you get workout instructions or figure and routine corrections, stay off the wall and do eggbeater or vertical flutter kick. Work enough to keep your heart beating faster and keep your blood flowing. As soon as you get cold, it is harder to get warm again!
- Set a goal for practice! When you have clear goals to improve a skill or accomplish certain drills or choreography in practice, you will stay motivated and keep moving until your goals are accomplished.
- Visualize a warm place: Imagine yourself in a warm place- a hot shower, a sunny beach, a warm bed.... Take a deep breath and feel yourself float away to this warm and comforting place. The brain and body cannot tell the difference between the imagination and reality. This is the basis of effective visualization!
Use your mind and body to stay warm and train effectively!
esynchro Tuesday Tip February 25, 2014
6 Exercises for a Tighter Back Pike for Barracudas!
The back pike position in the Barracuda is important for a high and straight thrust. The Back Pike should be as compact as possible with the head near the surface and the hands near the ankles. Flexibility and strength are necessary to achieve a compact back pike position!
- In the water, get in a tuck position with the face at the surface. While trying to keep the face near the surface, extend the legs over your face. Hold as tight as possible for 4 to 8 counts. Repeat 10 to 20 times.
- After reaching the pike in Exercise 1, somersault around. Keep pulling your legs in tighter to your torso and use this pressure to help you somersault. Repeat 8- 10 times.
- Get in a back pike position upside down in the water. Using your abdominals and hip flexors pull into as tight a position as you can. Relax to a more open position and then repeat 10 times at a quick tempo. Do 2-3 sets.
- On land, get in a tuck position on your back with your arms overhead. Extend your legs over your head and pull into as tight a position as possible. Hold for 4 counts and then return to the tuck. Repeat 10 times for 2-3 sets.
- In a sitting position on land, pull into a tuck and hold your shins with your arms while balanced on your buttocks. Extend the arms, legs and back into a V position. Hold for 2 to 4 counts and return to the tuck. Repeat 10-20 times for 2-3 sets.
- Start in a V position on land with legs and torso extended up, holding the legs with the arms. Extend the back and arms, while trying to hold the legs as close to vertical as possible. Repeat 10-20 times for 2-3 sets.
Get a higher Barracuda by starting in a tighter back pike position!
Tuesday Tip February 18, 2014
Tips for Success!
Persistence, perseverance, purpose, practice, preparation and the performance!
It takes years to reach Olympic level in any sport...
- Perseverance through challenges, failures and success.
- Persistence to continue when all the odds are against you, when it seems like those around you no longer support you, when tackling a new skill.
- Purpose- working to improve skills, flexibility, and fitness every day, not to be perfect today, but to be one step closer to perfection today.
- Practice skills until you master them and can repeat them to the best of your ability every time.
- Preparation- much more than practice. Prepare to perform your best at the big event.
- Performance- with preparation you can enjoy the performance and enjoy the experience!
Not every athlete can reach the Olympics, but you can reach your own ultimate potential and you can prepare to perform your best for every competition!
Tuesday Tip February 11,2014
Tips for better Switches in Routines!
Everyone wants to move as fast as possible in routines, switching rapidly from one position to the next. But moving fast does not cover up poor height and execution, and often gets so splashy that we can barely see the legs.
- Choreograph transitions that are clean and direct.
- Include many different positions throughout a routine. Using the same positions like helicopter and fishtail multiple times in a routine in different hybrids is repetitive and boring...
- Always focus on going UP! Even when one leg is moving down to the surface, focus more on the leg going up.
- Keep the hips as close to the surface as possible.
- Stay clean-no splashing! Judges and audience want to see your legs. The best way to minimize splashing is to focus on lifting the legs UP, rather than pulling the legs down.
- Remember that the legs move from the hip flexors, upper hamstrings and buttocks. Muscles pull- they do not push.
- Sometimes when doing very quick small leg moves, it is best to think about just moving the feet. Discover what is the best focus for your specific moves.
In duets and team routines, long, intricate and rapid sequences are often the most exciting part of a routine. Great switch combinations highlight the best of SYNCHRONIZED swimming!
Tuesday Tip February 4, 2014
4 Tips for A Better Lift to Fishtail from Front Pike
The lift to Fishtail from a surface front pike is one of the most common transitions. Correct extension, use of the core muscles, and correct sculling technique are all important for good execution.
- Extend from the center UP through the hips throughout the lift. Extending forward out the moving leg can cause the swimmer to over pike, travel face first, and lose height.
- Lift the leg from the upper hamstrings and buttocks- the back side of the moving leg. Do no try to push from the front of the thigh- quadriceps. Remember, muscles act by pulling on bones, not by pushing.
- Start the lift with paddles with the arms nearly straight. Press straight down towards the bottom. Do not circle the arms and pull in towards the face. This will cause the swimmer to travel face first, over pike, and be low.
- Paddles (or support scull with straight arms) should be done with arms in front of the shoulders. Do not reach in with the hands. This will cause the swimmer to round their back and over pike.
A simple 1-2-3... Extend UP, Lift with back of thigh, and paddle with straight arms in front of the shoulders!
January 28, 2014
7 Tips for Better Ballet Legs
- Land Training 1: Lay on your back on the floor. Bend the knees with feet flat on the floor. Lift the buttocks off the floor so there is a straight line from the knees through the shoulders. Lower back to the floor. Repeat 25 times for 1 set. Do 2 to 5 sets. Repetitions can be done at slow and fast tempo.
- Land Training 2: Lay on your back in a good back layout. Squeeze the buttocks and lift the hips off the floor. Hold for 2 to 10 counts and then lower to the floor. Repeat 10 times for 1 to 5 sets.
- Technique 1: In the pool, rotate the elbows towards the bottom of the pool in back scull. This should rotate the shoulders back and open the chest.
- Technique 2: Increase the tempo of the scull. SuCll faster and in a smaller range.
- Technique 3: Keep the hands wide and flat. Scull with the palms of the hands.
- Pool Training 1: Assume a ballet leg position. Press up to maximum height and hold for 5 to 10 seconds. Relax and hold at a lower height for 10 seconds. Repeat the press up and hold 5 to 10 times per set. Repeat 2 to 5 sets.
- Pool Training 2: Start in a back layout sculling across the pool. Rapidly lift one leg into a bent knee and then extend to a ballet leg. Hold at maximum height for 5 seconds. Then lower to the bent knee and extend into a layout. The goal is to keep the stomach close to the surface throughout the lap. Repeat for 2 to 8 laps.
Great ballet legs require strength, good technique and training!
Start improving your ballet legs today!
Tuesday Tip!
January 21, 2014
Get a Higher Vertical
Almost every synchro swimmer wants to get higher in a vertical. How do you accomplish this goal?
First and most importantly, set a specific goal- exactly how high do you want to get? Measure your current height. If you are currently at the top of you kneecap, a realistic goal might be to hold a vertical 6 inches above this. Measure this point on your legs so you know exactly where it is. This goal will not happen overnight- this may be a 6 month goal. Break this down into 3 segments of 2 months each so you can monitor your progress and understand that you may not get much higher immediately with more gain in height later on , or vice versa, you may jump up quickly and then plateau for a while.
Next, set up a plan to train. What do you train? Strength, endurance, flexibility, technique, and maximum height.
- Flexibility- increase shoulder flexibility so you can achieve the necessary range of motion. Hint: Forearms and hands need to aim straight out to the sides with the back aligned properly in support scull position.
- Strength- some of this can be done on land with Lat pulls, wrist curls, push-ups, and isometrics for the biceps and triceps.
- Endurance- swimming sets and sculling laps will help increase general endurance and that of the muscles used in sculling. For specific support scull endurance, support scull while standing in the shallow end ( total time of at least 5 minutes) and include support scull sets in verticals. For endurance, these can be performed at a moderate height for long durations.
- Technique- Correct range of motion of the scull is from about 45 degrees forward on the IN scull to about straight out to the sides on the OUT scull. Reach up toward the surface while the hands form a figure 8 path during each scull. Increase the tempo of the scull to get higher.
- Maximum height- Incorporate sets of vertical (crane or bent knee vertical) holds at maximum height. Set a specific height for each set and maintain this height.
These are just a few tips to help you increase height.
Set your goals now for higher verticals
in the months ahead!
Tuesday Tip January 14, 2014
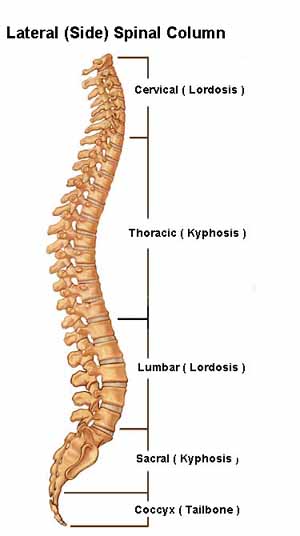
Aligning the Back and Hips in Vertical
The hips should be aligned in a North-South Direction in any vertical position. This is a neutral position of the hips and affects the lower back alignment. It does not mean that the back is flat. There are 4 natural curves in the spine that help protect the spine from injury. These natural curves should remain in a good vertical. When swimmers try to flatten the low back or lumbar region, they can create pain and injury.
Incorrect positioning of the hips is usually with the buttocks out or the buttocks tucked forward with the abdominals too tight. This latter positioning is often achieved when swimmers are trying to flatten the lower back.
The upper back across the shoulder blades should be wide and “flat”- shoulders not rounded or pinched. Some muscle tension in the lats, rhomboids, pectorals and trapezius muscles will help maintain a good position of the upper back.
Allow swimmers to “find” their best back position by shifting from correct to incorrect positions and back to the correct position. Adjust the hips forward and back and round or pinch the shoulder blades. Always return to the correct position. Also “play” with muscle tension in the abdominals, buttocks, upper back and shoulders. Swimmers should find that a low to moderate tension in all the core muscles will help to maintain a correct alignment. Too much tension in one set of muscles can throw off alignment.
Tuesday Tip January 7, 2014
Pool Drills for a Better Knight Position
Achieving a good knight position depends largely on flexibility as well as effective sculling position. In addition, setting specific goals for maintaining height in a knight position or during a transition to and from a knight position can give you surprising results.
7 Drills for Better Knight Positions- Make sure to repeat all drills with both legs!
- Start in a “hook” position (bend the forward leg in a split position so the shin is vertical). Aim for having both thighs flat at the surface. Keep the back thigh dry at the surface as you extend the bent leg up to the knight position. Start slowly at first. Then repeat the extension and bend to the hook at different tempo’s from 1 count to 8 counts.
- Repeat Drill #1 with focus on sculling position. In the hook start with the arms forward in support scull. Then shift the arms back so the elbows are behind the midline of the body and hands are sculling mainly behind the torso. Now repeat the extension and bend of the front leg.
- Start in a hook position and position the arms as in Drill #2. Then shift the hands and forearms into totem scull position with a minimal lift of the upper arms. It is ok to pinch the shoulder blades to position the hands slightly behind the head. Repeat the extension and bend several times.
- Start in a side fishtail position at maximum height with the thigh of the horizontal leg at the surface. Slowly rotate into the knight position. The goal is to keep the thigh of the horizontal leg dry and a constant water level on the vertical leg. Rotate back to the side fishtail. Repeat several times.
- Start in a bent knee vertical position at maximum height. Slide the foot of the bent leg back along the surface into a knight position. Keep the shin dry as the leg extends back and then try to get the thigh dry.
- Start in a bent knee vertical position at maximum height. Slide the foot of the bent leg back along the surface and rotate the thigh out so the bent leg is laying flat on the surface in a rotated out position. Extend the bent leg back into the knight. Pause and bend again. Repeat several times.
- Start in a split position in support scull. Lift the forward leg into a knight position. Then transfer the arms into totem scull/ overhead torpedo (this should be a small move of the hands). Transfer back and forth between totem and support scull several times while maintaining a constant height level.
Tuesday TIP! December 17, 2013
Balance and Control
Maintaining balance andncontrol while hiolding positions and through transitions is the key to success in figures and routines. 3 factors come into play in balancing positions: alignment or accuracy of position, muscle tension and arm placement or sculling position. Providing swimmers with the opportunity to learn to manage these three variables will help them master balance and control in the unstable medium of water.
Basic Water Drills:
1. Position Holds: hold basic posiitons for 10 to 30 seconds in one or several different sculling positions. Inverted tuck position in support scull, surface front pike position in barrel scull, support scull and paddles, submerged single and double ballet legs, bent knee surface arch in support scull, totem/overhead torpedo and split arm scull.
2. Repeat the same positions holding water bottles or milk jugs.
3. Repeat position holds with sculling or jugs. Tense different muscles or muscle groups in hte body spearately or in sequence and notice how it affects balance, stability and sculling position. Muscle groups or body areas to tense: stomach/ abdominal muscles, buttocks, hands and forearms, biceps and triceps/ upper arms, feet and calves, quadriceps, shoulders and back.
4. Start in a vertical position at the ankles. Bend forward at the hips into a submerged double ballet leg position. Return to vertical. Bend to the left, right, and arch back as far as possible. Return to vertical each time. Maintain vertical alignment of the legs and a constant height.
5. Sculling transitions: hold positions and transition between sculls while maintaining a stable position. Inverted back tuck position: start in support scull and gently transition into back scull. Hold for a couple of sculls and transition into support scull.
Bent knee surface arch position: start in totem and transition into support scull. Hold and transition back into totem. From totem transfer into split arm scull. Return to totem and repeat the sculling transitions multiple times.
Surface front pike position: start in barrel scull over the head. Transition into straight arm support scull for 8 to 10 sculls and then return to barrel scull. Transition into paddles and hold for 8 to 10 paddles. Return to barrel scull.
Vertical at ankle height: start in totem scull and then transfer to support scull. Transfer back to totem. Maintain stable height and alignment.
These basic drills can be done by swimmers of nearly any skill level to help improve balance and control in the water.
Tuesday Tip December 10, 2013
Quick Eggbeater and Kick Transitions
In your fast-paced routines, it is essential to have the ability to transition the legs rapidly between eggbeater and kicking.
4 Drills for Fast Transitions:
- Start in rotary (eggbeater leaning forward onto the stomach). Do a whip / breaststroke kick. Then pull the legs back into rotary. Set counts. Ex. Rotary counts 1-2-3-4, kick count 5 (or 5-6) , pull legs into rotary counts 7-8. Set a quick pace for the counting or speed up these counts.
- Same as drill #1, add flutter kick for 2-3 counts after the whip kick. Flutter kick on counts 6-7 and pull legs into rotary on count 8.
- Eggbeater in the deep end (or do as laps)- counts 1-2-3-4. Do two rapid whip kicks (vertical or moving forward) on counts 5 & 7. Pull back into eggbeater on count 8.
- Lay on the side in side flutter kick. Flutter kick counts 1-2-3-4. Do 2 scissor kicks on counts 5 & 7 and then return to flutter kick.
These drills will help train the muscles and the brain to move the legs quickly in routine transitions. Get Moving!
Tuesday Tip December 3, 2013
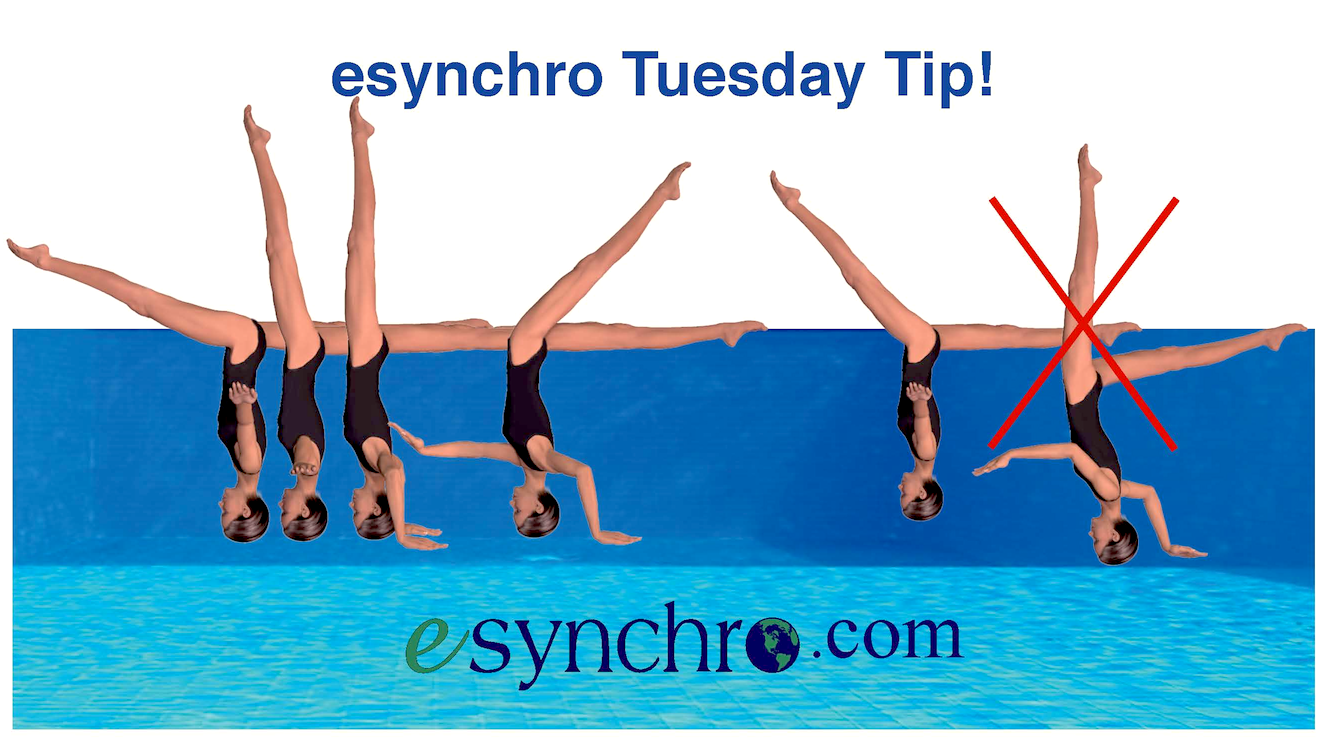
8 Tips for A Better Porpoise Lift
- Focus on keeping the back flat. Make the spine long and the back wide.Set the lats by pulling up toward the hips.
- Use the abdominals to keep the back flat. Set the stomach muscles but do not shorten them (this would cause the back to round.)
- Use the back of the legs and the buttocks to lift the legs.
- Lift the legs from right near the hips. Most of the weight of the legs is in the thighs. Focus on lifting the upper thighs, not the feet.
- Whether using paddles or support scull, the arms should be about shoulder width apart or slightly wider. Do not reach in to touch the fingertips together. This will cause the back to round.
- Press down with paddles. Do not circle the arms and pull forward.
- Arms are straight in paddles or support scull to start the lift. Do not reach toward the feet. Keep the back set and shoulders still.
- Extend up from the hips through the whole lift. Do not extend out through the feet.
Tuesday Tip! November 26, 2013
3 Tips and Drills for Better Freestyle
1. Stroke Timing: Adjust the timing of your stroke. Start with a Drill: Push off the wall with both arms overhead. Leave one arm extended forward and do a complete stroke with the other arm until hands are together. Then do a stroke with the opposite arm. Keep alternating arms for 50 to 100 yards. Start with this alternating stroke pattern and adjust slightly so that your pull with the forward arm begins just before the opposite arms extends all the way forward. Notice the power in each pull with this timing.
2. Kick Timing: Do at least 4 flutter kicks per stroke. When you are sprinting, increase the kicking tempo to 7 or 8 kicks per stroke. Drill: When doing the alternating stroke drill in #1, count your kicks and do 4 to 6 kicks per stroke.
3. Extend through the middle finger: Feel as if your pull initiates with the middle finger. Finger Drill: Swim one lap with your hands in a fist. Then extend your index fingers for one lap. Now extend your index and middle fingers for one lap. Then extend your 2nd, 3rd and 4th fingers, Finally extend the all the fingers. Feels as if your are going to touch the wall ahead of you on each stroke.
Remember- Synchro is synchronized SWIMMING! Great swimming technique will help you become a better synchro swimmer.
Tuesday Tip November 19, 2013
Rapid Turns
Turning quickly both upside down and right side up is a critical skill in fast-paced routines. In both cases, it is helpful to reach the leading arm or leg slightly back behind the torso on a “prep” count. Then use this lead arm or leg to get leverage on the water and rapidly whip the hips in toward that leg or arm. When done effectively, one strong whip can turn the body more than 360 degrees.
Eggbeater Drill 1: Start in eggbeater with arms sculling. On count 1, do a rapid 1/4 turn. On count 5 do a rapid 1/4 turn, continuing in the same direction. Continue for several full rotations and then repeat in the opposite direction.
Eggbeater Drill 2: Start in eggbeater with arms sculling. On count 1, do a rapid 1/4 turn. On count 5 do a rapid 1/4 turn, turning back to the original direction. Repeat multiple times. This can also be done as laps. Increase the turn to a 1/2 or 180 turn on each count. You can also change the counts to be slower or faster.
Tabletop Drill: Start in a tabletop or helicopter position. Perform the same drill as done in eggbeater. Do a rapid 1/4 turn, pause and then turn again. Continue in the same direction or reverse direction after each turn or after 2 or 4 1/4 turns.
For variation in any of the drills, turn to different angles and perform in patterns where diagonals are important.
Learn to get leverage with arms and legs and turn rapidly!
Tuesday Tip November 5, 2013
10 Tips for a Better Kip Lift
- Start in a balanced and compact tuck. Shift forward and backward until you find the most balanced position and then, if necessary, adjust the shins to a vertical line.
- Tuck the head forward and look straight up the shins to make sure the shins are vertical.
- Support scull very lightly- feel as if only the hands are moving.
- Stay in support scull for the entire lift.
- Keep watching the shins rise vertically as you start the lift by keeping the head tucked forward.
- Lift your legs with the upper part of the hamstrings and the buttocks. Focus on the back side of the body.
- Gradually move your arms wider as you straighten your back.
- Your arms should precede your legs into your vertical sculling position.
- Imagine someone or a rope around your ankles is pulling your legs up to the sky.
- Finish gently by extending up into the vertical.
- Keep the lats set with the back flat as you transfer to barrel scull.
- Slide the hands gently forward and down into barrel scull, leading with the fingertips.
- Arms should angle down from 30 to 45 degrees in barrel scull in the layout.
- Pull or press forward with the lower stomach or belly button to pike. Bend at the hips.
- Don’t look down or towards the feet.
- Keep the back flat and wide with the lats set.
- The torso should move into the arms so the arms end up overhead in barrel scull as the pike down is finished.
- It may feel slightly arched in the lower back or as if the buttocks are “stuck out” to create a good 90 in the pike.
- Make the 90 degree angle with the back of the body- not the front.
- Relax and allow the hips to bend. The pike down is easy- it should look and feel effortless.
Start your figures with a perfect pike down!
Tuesday Tip October 22, 2013
Sculling Endurance
General cardio endurance can be increased by doing any activity resulting in a stronger heart, greater blood flow, better functioning lungs and many more improvements to the cardio-respiratory systems.In sports, it is important to improve specific muscular endurance in the muscles that perform specific skills. As with the overall cardio-respiratory system, the training activity must be done for at least 5 minutes to begin making small improvements. The 5 minutes can be done as one long set or broken into multiple sets with short rest periods, i.e. 10 thirty second sets with 5-10 seconds rest between.
How to improve sculling endurance:
- Stand in the shallow end of the pool or scull upright in the deep end.
- Put the arms in a sculling position to do back scull with palms facing towards the bottom of the pool.
- Scull for the desired time.
- You can shift the arm position from fingertips pointing straight forward through all the angles until fingertips are pointing straight out to the side.
- Keep the hands loose- fingers can even be slightly spread.
- Extend out through the middle finger.
- Move the water with the palms of your hands.
- Try to keep an even tempo of sculling- OR vary with slower and faster tempo’s throughout the set.
If done consistently over weeks and months, a simple 5 minute set of sculling will increase endurance and strength in the sculling muscles- the forearms and hand muscles, the triceps and biceps, and the muscles around the shoulder.
Get Strong- Scull long!
October 15, 2013
7 Tips for Better Posture
- Extend up the spine
- Lengthen the neck
- Open the chest
- Roll the shoulders back
- Align the shoulders over the hips
- Arch the back slightly in the water but do not lean back
- Practice good posture on land- ALL DAY LONG!
Great posture in the pool can help you appear bigger, more commanding and more confident!
Tuesday Tip October 8, 2013
5 Tips for Better Verticals
- Extend up through the legs and middle of the foot.
- Set the stomach/abdominal muscles, but not too tight. The stomach should absorb any movements below the surface so the legs appear stable and still.
- Reach up to the surface on the out sculls of support scull. The angle of the arms at the elbows should open on the out scull and close on the in scull.
- Make your hands as wide and flat as possible so you have more surface area to scull with. Tight cupped hands are too small. Do you feel the tension in your hands and arms or do you feel the water?
- Scull faster, not harder to get higher. Sculling harder is probably just tightening your arms, not really sculling better. Find the best tempo for you to get good grab or catch and to maximize height.
Tuesday Tip October 1, 2013
As Breast Cancer Awareness Month begins, make the time to take care of yourself. Eat healthy, exercise regularly, and get regular check-ups. For women over 21, do regular breast self-exams. At 40, get a mammogram- early detection does save lives.
This is posted in memory of two women who dedicated their lives to synchronized swimming and both fought valiant battles against breast cancer: Marian Kretschmer and Betty Hess.
Tuesday Tip September 24, 2013
Strength Training - Wrist Curls
Strength and stability of the forearms and wrists are critical in sculling. A great exercise to strengthen the wrists is wrist curls. These can be done with bands or light weights. Kneel with one leg forward or sit on a chair. Lean forward with one arm on your thigh- elbow and forearm extended along the length of your thigh with palm facing up. Hold the weight or band in your hand. Bend the wrist and hand up- contracting the forearm muscles. Relax and roll the weight or band all the way down to your fingertips- stop just before you will drop the weight. This helps you get the full range of motion in the forearm muscles.
Swimmers as young as 10 to 11 can start doing wrist curls- use light weights of about 5 pounds to start or bands with low resistance. Girls can start strength training earlier than males because of their faster development to full maturity. Make sure young girls are supervised and start with low weights until girls achieve correct form.
Tuesday Tip September 17, 2013
Nutrition
Proper nutrition for female athletes often seems to be a tricky problem- but it should not be. A common sense approach to eating a healthy well- balanced diet is the answer.
We all know the macronutrients of foods: proteins, fats, and carbohydrates, and the micronutrients: vitamins and minerals. The real key is to ingest a balanced amount of all of these nutrients and to include a large variety of foods.
Proteins: These are your meats, fish, eggs, beans, lentils, nuts, dairy products and soy. Each gram of protein has 4 calories of energy. Proteins are the main structural nutrients of the body, the source for building and repairing muscles and a building block of the immune system.
Carbohydrates: These include grains, pastas, cereals, breads, potatoes, vegetables, fruits, corn syrup, and anything with sugar in it. Each gram of carbohydrate also provides 4 calories of energy. Carbohydrates are the main energy source of the body and supply energy for muscular activity.
Fats: Oils, butter, margarine, nuts and avocados are sources of fats. Fats provide 9 calories of energy per gram. Fats are an energy storage source for the body and a source of energy for low intensity and long duration activity. Fats are generally decried as the bad food, but they are a necessary nutrient for the body, particularly in growing and maturing brains. Consuming quality fats such as avocados, nuts and olive oils can help your body shed your stored fat as energy.
How much should you eat of the macronutrients?
A healthy diet should consume:
- 45% to 65% of calories from carbohydrates.
- 20% to 35% of calories from fat.
- 10% to 35% of calories from protein.
This means that about 1/2 of your diet should be from carbohydrates and another 1/4 each from proteins and fats. For a young women who is training for synchronized swimming, the same principles are true. If training is intense or long in duration, the number of calories should be increased, but the percentages of each can remain about the same.
Cutting carbohydrates from the diet is not sensible and can even be harmful. The body will turn not only to fats for energy stores but also to muscle, in effect breaking down your muscles to feed itself. So instead of building muscle, you will be losing muscle. Stories of elite synchro swimmers being told to eat only 1/2 cup of rice per week are infuriating- these young women need fuel for their bodies and carbohydrates are the main source of fuel. But, rice, pastas, breads and potatoes are not the only source of carbohydrates. Fruits and vegetables are great healthy sources of carbohydrates with the added benefit of lots of vitamins and minerals. A very active teen however may find that the low calorie fruits and vegetables do not provide enough calories for long training sessions. In this case, add in healthy grains like whole grain breads and pastas, brown rices and potatoes- just limit the butter and sour cream.
Variety is an important factor in a healthy diet. Eat as many different healthy foods as possible in order to ingest a wide array of vitamins and minerals. A great way to do this is to try to eat foods- mainly fruits and vegetables- of 7 different colors every day. This can be difficult every day, but eat at least 4 colors every day and try to get to 7 at least 3-4 days per week.
Finally, WATER. Water is not often thought of as a nutrient, but it is essential for all bodily systems and processes. Without water, muscles cramp, it is difficult to think, energy levels decline and more. Try to drink 48 to 60 ounces of water per day, and even more if you are training intensely.
Nutrition is really quite simple-
- choose healthy foods
- eat a large variety of foods
- Eat a balance of carbohydrates, proteins and fats
- Drink water
- Eat enough calories to maintain, lose or gain weight in a common sense manner.
Tuesday Tip September 10, 2013
5 Tips for better Back Scull
- Rotate the shoulders and upper arms so the elbows point down towards the bottom of the pool.
- Loosen the hands so the palms are flat and the fingers are just there- not tight and not squeezed together- they can even be spread apart a little bit.
- Press the water with the palms of the hands rather than the fingers.
- Scull gently- do not attack the water.
- Speed up the scull to get higher or move faster. Do not try to scull harder- just faster.
Great back layouts precede to great figures!
Tuesday Tip September 3,
2013
3 more swimming tips!
- Gently grab the water. Swimmers often believe they have to be ballistic and attack the water. It’s better to be gentle. When you attack the water, your arms and hands are too tight to actually feel the water. The “work” you feel is just tension in the arms, it isn’t really helping you swim faster. In fact, it is probably slowing you down.
- Pull your hips past your hand on every stroke. Slow down for a few laps and feel how you can engage your lats and shoulder muscles to pull your hips over the top of your hand. It’s like a horizontal pull-up on every stroke.
- Keep your hands loose! Tightening your hands probably tightens your whole arm- wasted energy! And it will fatigue you faster. Your fingers can even be spread apart a little bit because the surface tension of the water between your fingers acts almost as if the fingers are together.
Swim- swim- swim! These tips all apply to sculling too!
Tuesday Tip August 27, 2013
Be a great swimmer!
Freestyle Technique
Swimming technique is critical to success in synchro. Good technique will help you scull better, travel more and transition better in routines, and strengthen the right muscles for synchro. Plus- you will get through workouts quicker.
3 Tips for good freestyle technique:
- Extend: as the hand enters the water, extend through the fingertips towards the far wall.
- Roll: as the arm extends forward roll the body to an angle between 30 and 40 degrees. Keep looking forward.
- Catch: rotate the palm and arm outward and gently “catch” the water with your palm. The wrist and elbow both bend a little.
As you warm-up, pay attention to these 3 points to improve your swimming.
Tuesday Tip August 20, 2013
8 Gymnastics move to improve agility, orientation, awareness, balance and flexibility.
Try some easy gymnastics moves to improve your physical abilities. These can be done at home, in a gym or anywhere with a soft floor and open area. If you have access to a gymnastics facility and instructor- great, but if not you can do many things on your own with a parent or coach as a spotter.
- Front and back somersaults- roll forward and backward in a compact tuck position
- Log rolls on the floor- lay flat on the floor in good vertical alignment with t


Tuesday Tip 3: March 26, 2013
Eggbeater
Eggbeater is a critical skill in synchronized swimming. It is often difficult to learn because of the alternating motion of the legs but once a swimmer gets it, it is like riding a bicycle- you rarely have to consciously think about how to do it. However, there are some very important aspects of the technique that can improve height, posture, speed of travel, and reduce the risk of injury.
- Thighs should be as wide and high as possible. Swimmers should aim to have their thighs straight out to the sides and at least parallel to the surface. It is better if the knees are higher than the hips. This gives a strong and stable base of support.
- Rotation initiates from the hip joint. The meeting point at the top of the femur (thigh) and the iliosacral area is a ball and socket joint, which means that it can rotate. The knee is a hinge joint; it does not rotate. The rotation of the femur or thigh combined with flexion and extension of the knee joint creates the circular path of the lower legs.
Although we often think that once a swimmer knows how to eggbeater, she needs no more instruction. Improving technique can help immensely, and better technique even makes it easier to get higher- less work!! Look for more eggbeater tips in the future!
Tuesday Tip 2: March 19, 2013
Patterns
Synchronized swimming is a sport that requires significant multi-tasking. The brain must be trained to function in several areas simultaneously. One of those areas is the awareness of patterns. Swimmers must learn the awareness necessary to maintain and change patterns.
- Perform land exercises, stretches, etc. in patterns.
- Always land drill in correct patterns.
- Do rotary and eggbeater warm-ups or training laps in patterns and include pattern changes.
- Do ballet leg laps in lines or patterns.
- Do support scull warm-up and figure drills in patterns.
- When working on team, always do it in the correct pattern.
- Vary the patterns utilized for training and drills: move swimmers to different positions and face different directions.
- Let swimmers create the patterns for drills and training. Have fun!
Tip 1: March12, 2013
Support Scull is one of the most important skills to master in synchronized swimming.
3 Important Techniques:
- Reach up toward the surface on the OUT sculls. Feel as if you are pulling your hips up to the surface on every scull.
- The tempo and the strength or pressure of the scull both impact the force created. Try sculling faster to increase height instead of just sculling harder.
- Rotate your upper arms in the shoulder joints in order to move your forearms forward and back.